Epson 410W Projector
From Longview ISD Technology Wiki
Contents |
Cleaning Filter
- Turn off the projector and allow it to cool down.
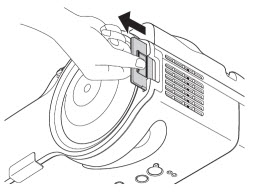
- The filter is located on the side of the projector that has the lamp.
- As you face the whiteboard it is on the right side of the projector.
- Slide the filter out, as shown. This allows both sides of the filter to be cleaned.
To clean the filter you can use:
- canned air (provide your own)
- blower (if available)
- small hand vacuum cleaner (if available)
- mouth – blow VERY, VERY hard!!
- DO NOT USE WATER to clean the filter!
To clean the vent: Epson recommends using a small vacuum cleaner designed for computers and other office equipment. (Do this only if you can see dust & lint inside the vent after you remove the filter.)
TroubleShooting
Projector Will Not Power On
- Make sure you do not see a light on the projector power button. (See Image 1)
- Use a yard stick to press the power button to see if it will turn on.
- If not, the electric breaker may be thrown. Tell custodian
- The power cord may be disconnected from the back of the projector. Check it.
- The remote may need new batteries. Replace the batteries. (See Image 2)
- If the Lamp and Temp buttons are both blinking red, call the Help Desk!
Projector Will Not Power Off
- If you are unable to turn the projector off with the remote try the following:
- Use a yard stick to press the power button.
- Call the Help Desk to remotely turn off the projector.
- If it cannot be remotely tuned off, unplug the power cord from the back of the projector.
- Plug the power cord back in.
- Overheating may cause the projector to not turn off.
- Once the projector has been turned off allow it to cool down and then clean the filter.
- If it still doesn’t work correctly, turn in a tech help request.
Screen Image Not Projecting
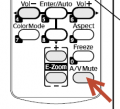
- If you see the green light on the power button, but do not see a screen image projecting, you may have accidentally hit the A/V Mute button. (See Image 3)
- Pressing the A/V Mute button on the remote control turns off the image and sound and darkens your screen.
- To turn the image and sound back on, press the button again.
Image Upside Down
If this happens a lot, then you could possibly be holding the AV Mute button for five seconds or more. This causes the projection setting to change from Front/Ceiling to Front which makes the screen appear upside down.
Possible Solutions:
- Hold the AV Mute button for five seconds to see if the screen returns to normal. (See Image 3) If your desktop image is still upside down, follow the steps below to correct it.
- Use the remote to change the settings:
-
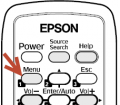
- Press the Menu button on the remote (See Image 4)
- Use the down arrow to select the Extended menu.
- Press the Enter button.
- Use the down arrow to select Projection and press Enter.
- Use the arrows to select Front/Ceiling. (See Image 5)
- Press the Enter button.
- Press the Menu button to close the menu.
Images:
Reset Lamp Hours
- You must reset the lamp timer after replacing the lamp.
- Turn on the projector.
- Press the Menu button on the remote control.
- Select the Reset menu.
- Select the Reset Lamp Hours. Press Enter. You will see a confirmation screen.
- Select Yes and press Enter.
- Press ESC to return to the main menu or press the Menu button to exit the menu system.Tech Tips


