Learning.com
From Longview ISD Technology Wiki
Contents |
Teacher Login
- 1. Go to Learning.com
- 2. Enter your network username
- 3. Enter the password assigned for Learning.com (Ask your ITS or call the Help Desk)
- 4. Type Longview ISD for the school district.
Class Setup
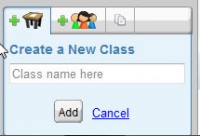
- 1. To set up your classes click on the Classes button.

- 2. Name your class and click Add.
- 3. Select the Grade Level
- 4. Leave Lesson Certificate as none.
- 5. Leave Student Tracking as Yes.
- 6. Set Lesson Sequence as Forced. Forced causes the students to do the lessons in the order you assigned them.
- 7. Set the Passing Rate, as desired. 70% - 85%
- 8. Add more classes, as needed.
Enroll Students
- 1. To add students to your class you must first select the class.
- 2. Then click the
 button.
 - 3. Choose the grade level.
- 4. Click the check box next your students’ names and click the
 button. Recommended: Enroll students one page at a time. There are sometimes several pages of students per grade level.
 - 5. Repeat the process for each page of students and for each class that you have created.
Add New Students
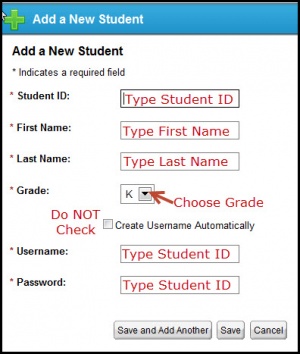
In the event a student is not already listed you can add a new student.
- 1. Click the
 button.
 - 2. Fill in the form.
- 3. Click either Save and Add Another or Save.
- 4. If a red message comes up that indicates there is another user in this district with this Student ID contact your ITS.
- 5. Your ITS will need to know the student’s:
-
- First & last name
- ID#
- Grade level
-
Add Curriculum to Classes
- 1. Click the
 button.
 - 2. Click on the desired curriculum icon.
- 3. Select the search parameters.
- 4 Click the View button to see a list of lessons.
- 5. Lessons are listed with the following codes. Note: You can view a lesson before assigning it by clicking the View button.
- 6. Click the Assign button to add the lesson to your curriculum.
Student Login
- 1. Go to Learning.com
- 2. Students will type in the following to login:
-
- Username = student ID#
- Password = student ID#
- Type Longview ISD for the school district.
-
Student Login Cards
- 1. Log into Learning.com
- 2. Click on a class name.
- 3. Verify that all of the students have been added to that class.
- 4. Locate the button named Print Log in Cards.
-
- Note: The button will not be visible until you have added curriculum to the class.
-
- 5. A file containing a login card for each student will be generated with 8 cards per page.
- 6. Printing login cards for grades PK – 3 is advised.


