Google Mail
From Longview ISD Technology Wiki
Patjohnson (Talk | contribs) (Created page with 'LISD Hosted Mail Creating a signature file<br>Overview Initial Setup <br>An email signature is a few lines of text placed at the bottom of outgoing mail. It often contains the …') |
Patjohnson (Talk | contribs) |
||
| Line 1: | Line 1: | ||
| - | LISD Hosted Mail Creating a signature file<br>Overview Initial Setup | + | LISD Hosted Mail Creating a signature file<br> Overview Initial Setup |
| - | <br>An email signature is a few lines of text placed at the bottom of outgoing mail. It often contains the sender’s name and contact information. | + | <br> An email signature is a few lines of text placed at the bottom of outgoing mail. It often contains the sender’s name and contact information. |
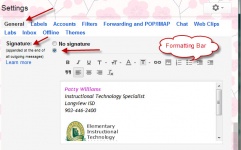
| - | + | [[Image:Google-signature-settings.jpg|border|left|250x150px]]To set up a signature automatically added to emails composed in LISD Hosted mail:<br> Click the Settings gear. Click on Settings.<br> 1. Go to General.<br> 2. Under Signature select the second radio button.<br> 3. Click inside the text box and press the Enter key twice.<br> 4. Type the desired signature in the text field.<br> • It's best to keep your signature to five or fewer lines.<br> • To add formatting use the formatting toolbar.<br> Note: There is no spell check on the Signature line so read carefully before you save your changes.<br> 5. Click Save Changes at the bottom of the window.<br> | |
| - | + | ||
| - | + | ||
| - | + | ||
| - | + | ||
| - | + | ||
| - | + | ||
| - | + | ||
| - | + | ||
| - | + | ||
| - | + | ||
Moving Signature above Original Message | Moving Signature above Original Message | ||
| + | <br> | ||
| + | <br> | ||
| + | <br> | ||
| + | <br> | ||
| + | <br> | ||
| + | <br> | ||
| + | <br> | ||
| - | + | In LISD Hosted Mail to insert your signature right after your message, and above your original message in replies:<br> 1. Click the Settings gear . Click on Settings.<br> 2. Click the Labs tab.<br> 3. Type Signature Tweaks in the search box.<br> 4. Make sure Enabled is selected under Signature tweaks.<br> 5. Click Save Changes.<br> | |
| - | + | ||
| - | + | ||
| - | + | ||
| - | + | ||
| - | + | ||
| - | + | ||
| - | In LISD Hosted Mail to insert your signature right after your message, and above your original message in replies:<br>1. Click the Settings gear . Click on Settings.<br>2. Click the Labs tab.<br>3. Type Signature Tweaks in the search box.<br>4. Make sure Enabled is selected under Signature tweaks.<br>5. Click Save Changes.<br> | + | |
Revision as of 19:50, 4 December 2012
LISD Hosted Mail Creating a signature file
Overview Initial Setup
An email signature is a few lines of text placed at the bottom of outgoing mail. It often contains the sender’s name and contact information.
To set up a signature automatically added to emails composed in LISD Hosted mail:
Click the Settings gear. Click on Settings.
1. Go to General.
2. Under Signature select the second radio button.
3. Click inside the text box and press the Enter key twice.
4. Type the desired signature in the text field.
• It's best to keep your signature to five or fewer lines.
• To add formatting use the formatting toolbar.
Note: There is no spell check on the Signature line so read carefully before you save your changes.
5. Click Save Changes at the bottom of the window.
Moving Signature above Original Message
In LISD Hosted Mail to insert your signature right after your message, and above your original message in replies:
1. Click the Settings gear . Click on Settings.
2. Click the Labs tab.
3. Type Signature Tweaks in the search box.
4. Make sure Enabled is selected under Signature tweaks.
5. Click Save Changes.

