From Longview ISD Technology Wiki
(Difference between revisions)
|
|
| (10 intermediate revisions not shown) |
| Line 1: |
Line 1: |
| | ==Overview of Clickers== | | ==Overview of Clickers== |
| | | | |
| - | ::::[[File:Clickers.JPG|700px|Clickers]]
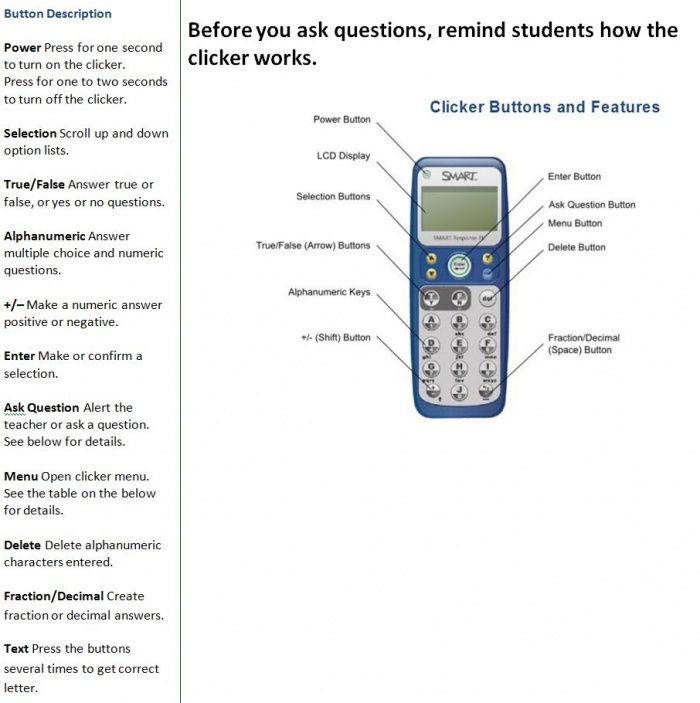
| + | [[File:Smresponsepe.JPG|700px|Clickers]] |
| | | | |
| | == [[Anonymous Mode]] == | | == [[Anonymous Mode]] == |
| - | == [[Create Classes]] == | + | == [[Create Classes and Add Students]] == |
| - | | + | == [[Using the Quick Grade Mode]] == |
| - | ===Name the Receiver=== | + | |
| - | If you have not already done so, name the receiver. Use '''Smart Notebook''' from your Presentation Cart.
| + | |
| - | | + | |
| - | :1. Click '''Start > All Programs > Smart Technologies >Smart Tools > Response Teacher Tools'''.
| + | |
| - | :2. You will see Welcome to Teacher Tools
| + | |
| - | ::::[[File:classsetup.png|300px|Class Setup]]
| + | |
| - | :3. Fill in the the information as shown but when you name your Classroom name, be sure you use something that will identify you to your students (nothing more than 8 characters). '''''This step actually names your Response Receiver'''''.
| + | |
| - | :4. Click '''Save''' to the presentation cart’s desktop.
| + | |
| - | | + | |
| - | | + | |
| - | ===Add Classes===
| + | |
Current revision as of 17:57, 31 October 2013
Overview of Clickers


