Create Classes
From Longview ISD Technology Wiki
(Difference between revisions)
| (One intermediate revision not shown) | |||
| Line 16: | Line 16: | ||
:12. Look at the '''very bottom''' of the spreadsheet. There may be statements that say '''max score, avg score etc'''. Delete those rows. | :12. Look at the '''very bottom''' of the spreadsheet. There may be statements that say '''max score, avg score etc'''. Delete those rows. | ||
:13. '''File''' >'''Save as'''> navigate to a folder in H drive named '''Smart Response Files'''. Open the folder> name file by period. (Alg2_1) Click '''save'''. | :13. '''File''' >'''Save as'''> navigate to a folder in H drive named '''Smart Response Files'''. Open the folder> name file by period. (Alg2_1) Click '''save'''. | ||
| - | :14. Close Excel document. If it asks you to save again say no. | + | :14. On this window, click '''Yes'''. |
| - | : | + | ::::[[File:Yeswindow.png|500px|Class Setup]] |
| - | : | + | :15. Close Excel document. If it asks you to save again say '''no'''. |
| + | :16. Go back to your gradebook. A dialogue box remained open that says '''“Export file open. You may close this file.”''' You can click on the '''close''' link or the '''red x'''. | ||
| + | :17. Repeat this process for each class period. | ||
===Name the Receiver=== | ===Name the Receiver=== | ||
| Line 32: | Line 34: | ||
===Add Classes=== | ===Add Classes=== | ||
| - | :1. Now you will see Gradebook | + | :1. Now you will see Gradebook. |
::::[[File:Addclass.png|400px|Class Setup]] | ::::[[File:Addclass.png|400px|Class Setup]] | ||
| - | :2. Click | + | :2. Click '''Add a class'''. |
| - | + | :3. Type a name for your class (8 or less characters NO spaces) and fill in other information. | |
| - | :3. Type a name for your class (8 or less characters NO spaces) and fill in other information | + | :4. Click the '''Add''' button. |
| - | :4. Click the Add button | + | :5. Click '''add students to your class'''. |
| - | :5. Click add students to your class. | + | :6. Select which class you want to add and click '''Next'''. |
| - | :6. Select which class you want to add | + | :7. Select '''Microsoft Excel''' and click '''next'''. |
| - | :7. Select Microsoft Excel and click next | + | |
:8. Browse to and select the Excel file containing the class list. | :8. Browse to and select the Excel file containing the class list. | ||
:9. You have now added a class to Teacher Tools. | :9. You have now added a class to Teacher Tools. | ||
| - | If you click the | + | '''If you click the '''Students''' tab, you can see your student’s listed.''' |
| - | + | :1. To add a student manually, click the '''Students''' tab. | |
| - | :1. | + | :2. Click once in the '''Empty Student field''' right below the Students tab. |
| - | :2 | + | :3. You will see the following window. |
| - | + | ::::[[File:Addstudent.png|400px|Class Setup]] | |
| - | + | :4. Click in the '''Student ID field''' and type in an '''ID#'''. | |
| - | + | :5. Click in the '''First Name field''' and type in the first name. | |
| - | : | + | :6. Click in the '''Last Name field''' and type in the last name. |
| - | + | :7. To add another student, just click in the next '''empty Student ID field'''. | |
| - | : | + | |
| - | : | + | '''Continue the above process until you have created and imported students to all your classes.''' |
| - | : | + | |
| - | : | + | |
| - | + | ||
Current revision as of 18:56, 22 October 2013
Export Classes from Skyward
- 1. Create a folder in your H: drive and label it Smart Response Files
- 2. Log in to Skyward Gradebook.
- 3. Select your first class
- 4. Make sure name and ID are displayed.
-
- If not go to Display Options button and click Student Display.
- In the display options section, make sure there is a check by student ID.
- Click the Save button
-
- 5. Click the tan export button in the top right.
- 6. In the dialogue window, click Open the Export file then click Open.
- 7. You are now looking at an Excel spreadsheet with names and IDs.
- 8. Select rows 1 and 2 and delete .
- 9. Select the ID column, right click and cut.
- 10. Select Column A, right click and insert cut cells.
- 11. Delete all columns that do not contain ID and Names. (Select the column, right click and Delete.)
- 12. Look at the very bottom of the spreadsheet. There may be statements that say max score, avg score etc. Delete those rows.
- 13. File >Save as> navigate to a folder in H drive named Smart Response Files. Open the folder> name file by period. (Alg2_1) Click save.
- 14. On this window, click Yes.
- 15. Close Excel document. If it asks you to save again say no.
- 16. Go back to your gradebook. A dialogue box remained open that says “Export file open. You may close this file.” You can click on the close link or the red x.
- 17. Repeat this process for each class period.
Name the Receiver
If you have not already done so, name the receiver. Use Smart Notebook from your Presentation Cart.
- 1. Click Start > All Programs > Smart Technologies >Smart Tools > Response Teacher Tools.
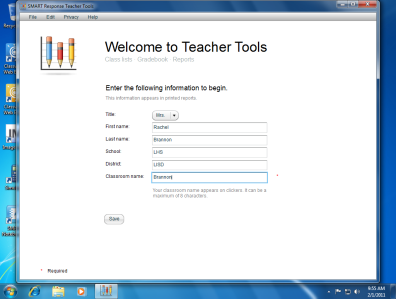
- 2. You will see Welcome to Teacher Tools
- 3. Fill in the the information as shown but when you name your Classroom name, be sure you use something that will identify you to your students (nothing more than 8 characters). This step actually names your Response Receiver.
- 4. Click Save to the presentation cart’s desktop.
Add Classes
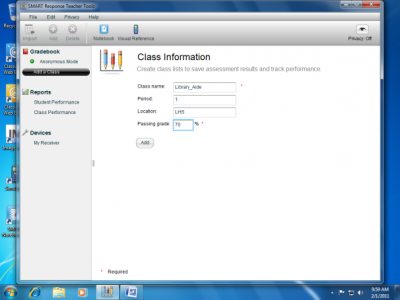
- 1. Now you will see Gradebook.
- 2. Click Add a class.
- 3. Type a name for your class (8 or less characters NO spaces) and fill in other information.
- 4. Click the Add button.
- 5. Click add students to your class.
- 6. Select which class you want to add and click Next.
- 7. Select Microsoft Excel and click next.
- 8. Browse to and select the Excel file containing the class list.
- 9. You have now added a class to Teacher Tools.
If you click the Students tab, you can see your student’s listed.
- 1. To add a student manually, click the Students tab.
- 2. Click once in the Empty Student field right below the Students tab.
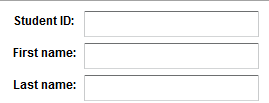
- 3. You will see the following window.
- 4. Click in the Student ID field and type in an ID#.
- 5. Click in the First Name field and type in the first name.
- 6. Click in the Last Name field and type in the last name.
- 7. To add another student, just click in the next empty Student ID field.
Continue the above process until you have created and imported students to all your classes.


