Customize Images and Transitions
From Longview ISD Technology Wiki
(Difference between revisions)
(Created page with '==== Transitions ==== By default, transitions are inserted between pictures in your story. You can specify the number of seconds a transition will display or you can let Photo St…') |
|||
| Line 21: | Line 21: | ||
:::[[File:specifystartfinish.jpg|150px|Begin Story]] | :::[[File:specifystartfinish.jpg|150px|Begin Story]] | ||
:3. In the '''Start Position''' box, do one or both of the following: | :3. In the '''Start Position''' box, do one or both of the following: | ||
| - | :a. To resize the rectangle, point to a side or corner of the rectangle. When the cursor changes into a '''double-headed''' arrow, drag the handle. | + | ::a. To resize the rectangle, point to a side or corner of the rectangle. When the cursor changes into a '''double-headed''' arrow, drag the handle. |
| - | :b. To move the whole rectangle, point to the center of the rectangle. When the cursor changes into a '''four-headed''' arrow, drag the rectangle to the area of the picture that you want to receive focus when the picture first appears in your story. | + | ::b. To move the whole rectangle, point to the center of the rectangle. When the cursor changes into a '''four-headed''' arrow, drag the rectangle to the area of the picture that you want to receive focus when the picture first appears in your story. |
:4. In the '''End Position''' box, repeat the previous '''3a''' and '''3b''' steps. | :4. In the '''End Position''' box, repeat the previous '''3a''' and '''3b''' steps. | ||
:5. If you want the motion for the selected picture to start where the motion for the previous picture ended, select the '''Set start position to be the same as end position of the previous picture''' check box. | :5. If you want the motion for the selected picture to start where the motion for the previous picture ended, select the '''Set start position to be the same as end position of the previous picture''' check box. | ||
Current revision as of 17:17, 5 March 2013
Transitions
By default, transitions are inserted between pictures in your story. You can specify the number of seconds a transition will display or you can let Photo Story set the duration automatically.
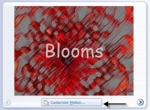
- 1. On the Narrate your pictures and customize motion page, click the picture for which you want to select a transition, and then click Customize Motion.
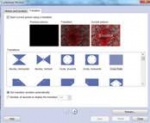
- 2. Click the Transition tab.
- 3. If necessary, select the Start current picture using a transition check box.
- 4. In the Transitions box, click a transition.
- 5. If you want to specify the number of seconds the transition will be displayed when your story is played, select the number of seconds to Display the Transition Option, and then type or select the number of seconds you want the transition to display.
- 6. Click Save to save the motion and duration changes you made.
- 7. To preview your story with the transitions, click Preview.
- 8. When you are done selecting transitions for the pictures in your story, click Close.
Customize Motion
- 1. On the Narrate your pictures and customize motion page, click the picture for which you want to specify the motion, and then click Customize Motion tab.
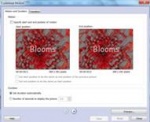
- 2. In the Customize Motion dialog box, select the specify start and end position of motion check box. A rectangle with handles appears on the picture in the start position and end position boxes.
- 3. In the Start Position box, do one or both of the following:
- a. To resize the rectangle, point to a side or corner of the rectangle. When the cursor changes into a double-headed arrow, drag the handle.
- b. To move the whole rectangle, point to the center of the rectangle. When the cursor changes into a four-headed arrow, drag the rectangle to the area of the picture that you want to receive focus when the picture first appears in your story.
- 4. In the End Position box, repeat the previous 3a and 3b steps.
- 5. If you want the motion for the selected picture to start where the motion for the previous picture ended, select the Set start position to be the same as end position of the previous picture check box.
- 6. Moving the rectangles clears the check box.
- 7. If this picture does not have narration and you want to specify the number of seconds it will be displayed when your story is played, select the number of seconds to display the picture option, and then type or select the number of seconds you want the picture to display.
- 8. Click save to save the motion and duration changes you made.
- 9. To preview the panning and zooming effects, click preview. When you are done customizing the panning and zooming motion for the pictures in your story, click close.


